Table of Contents
Simple Sheet Customization- Adding or Modifying the Columns Shown in Sheets
- Changing Sheet Column Settings
- Saving Changes to the Sheet View
- "Edit View" Option Still Available
The last update we rolled out included a massive enhancement to help users easily edit data directly from sheet view. With this new functionality in place, there were three new goals that we sought to accomplish with this next sprint:
- Make customizing sheets radically easier for users
- Enable even more user actions to be done directly through the sheet
- Streamline drop down selections
Simple Sheet Customization
Adding or Modifying the Columns Shown in Sheets
The new add button in the top right side of sheets allows users to easily add or remove new columns from the sheet view.

The left side of the drop down form contains a list of the fields that can be added or removed from the sheet view. Don't see the field you would like to add? You can use the right side of the drop down form to select the field type you would like to add to the view.
Changing Sheet Column Settings
After the columns have been added to the sheet view, the user can quickly modify column settings:
- Column Widths: Drag and drop the right edge of any column to adjust the width.
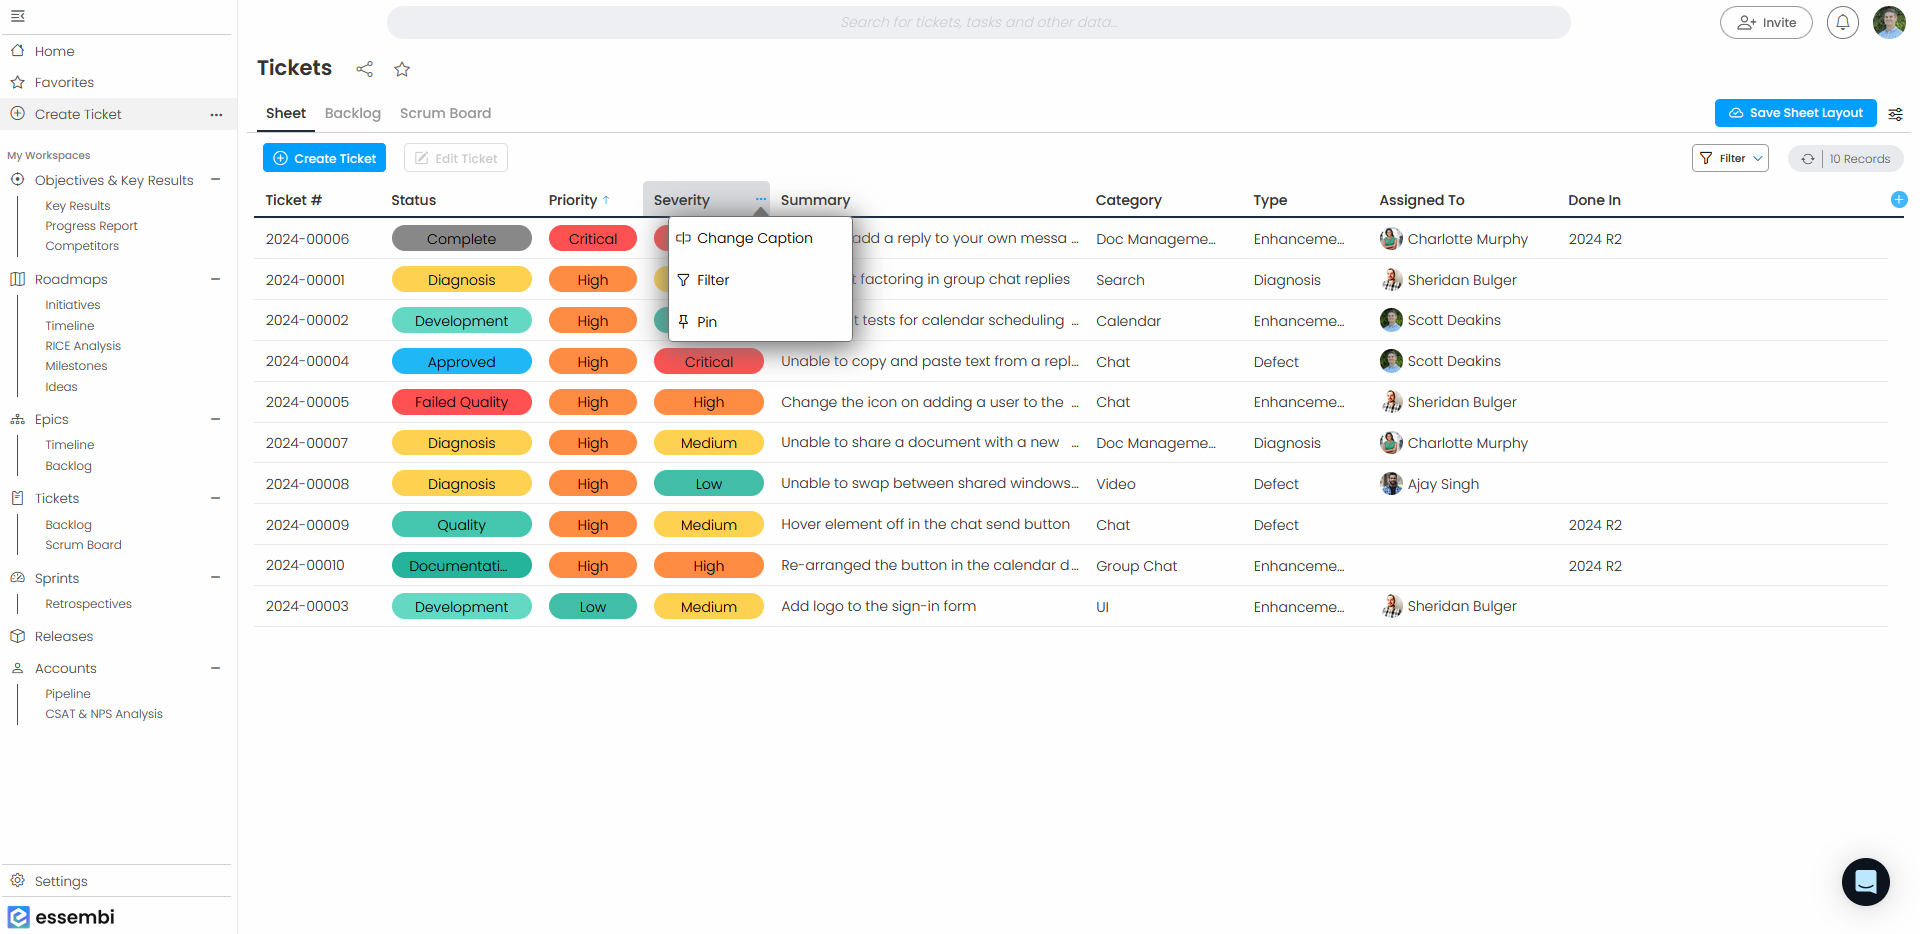
- Sort Data within Columns: Select the arrow in the grid header to change the sort of data within the sheet. Remember, you can always hold shift and select the column's sort to add multiple sort levels to a sheet too.
- Rename Columns: Any column name can be renamed using the option under the "More" drop down.
- Pinned Columns: Columns can be pinned to the left side of the view to always show up even when a user scrolls horizontally to view more fields. This option is available under the "More" drop down button on the column header.

Saving Changes to the Sheet View
Once changes have been applied to the sheet view, the user can select the "Save Sheet Layout" button in the view to apply the changes to the sheet permanently. Note that users must have the appropriate role based security options set in order to update the sheet layout permanently.
"Edit View" Option Still Available
Users may still update the sheet layout by accessing the "Edit View" drop down option from the workspace and view settings option in the top right. This view enables users to:
- Rename the view
- Select a default filter to apply each time the view is launched
- Override the table name that is shown in the add button
- Select a parent view to change how the view is displayed in the menu and within the workspace

Functionality Now Available Directly on the Sheet
The New Sheet Row "More" Button
On the left hand side of the highlighted sheet row, you will see a new more button. From here multiple options now exist:
- Edit Record in Form: We removed the edit button at the top of the sheet as the form is now used for editing the records directly. Now if users would like to edit a record in the form, they can launch the form using this option.
- Share: Copies the record to the clipboard.
- Favorite: Marks the record as a favorite to show in the favorites menu.
- Watch: Marks the record as watched so that any time a change is made to the record it shows up as a notification for the user.
- Discussion: Launches the discussion thread for the selected record.
- History: Enables the user to view who created the record and when, plus any future updates that were made to the record.
- Archive: Marks the record as archived so that the user no longer sees it in by default in view (note it is still available to be un-archived or viewed in historical reports).

Streamlined Drop Down Selections
Drop downs are the windows that pop up when you try to edit a record such as status, health, owner or any other record that has multiple options within Essembi.
Single Click to Select Records
Select the record you want with a single click rather than two clicks. A small change that should save a lot of clicks and be a little more intuitive for your new team members.
Bye, Bye Buttons
We removed the history and edit buttons from drop down windows. You can now access these options using the "More" button the left hand side of each option in the drop down.
